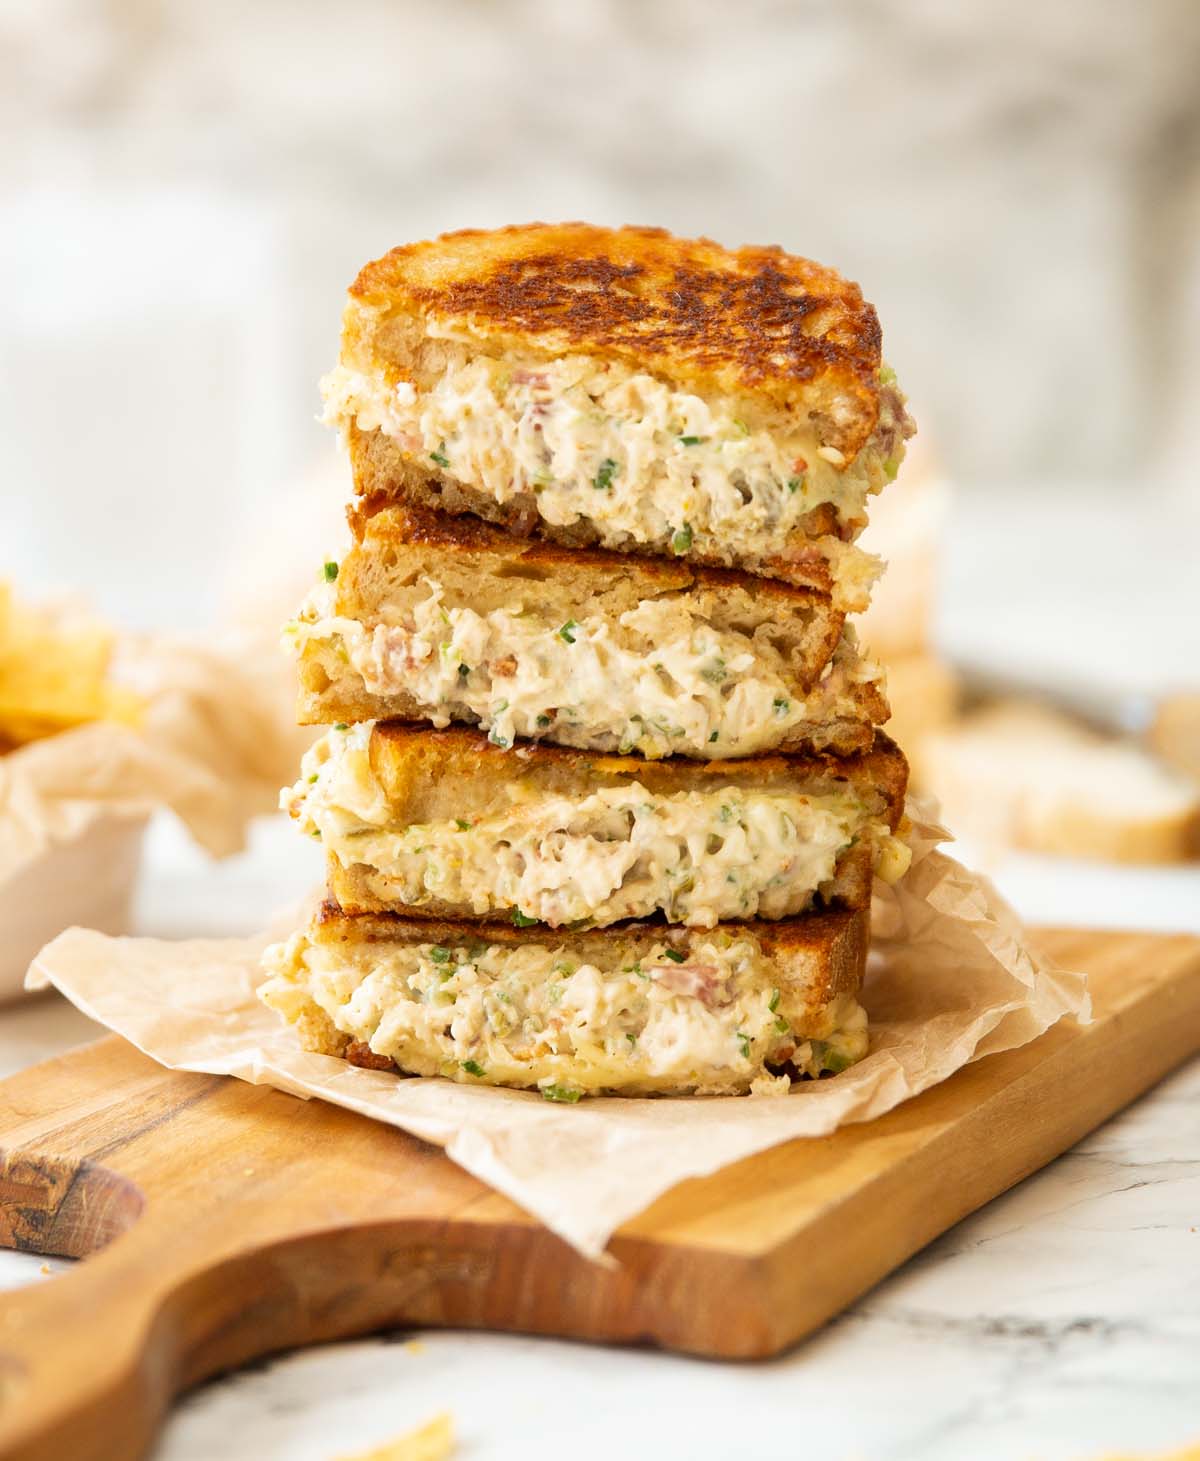
Here I’ll show you the most irresistible way to whip up a chicken melt!
Whether you’d call this a chicken toastie, chicken grilled cheese or chicken melt, there’s an endless number of ways you can make a toasted chicken sandwich. Today I want to show you a classic version that you’ll make time and time again! Follow me…
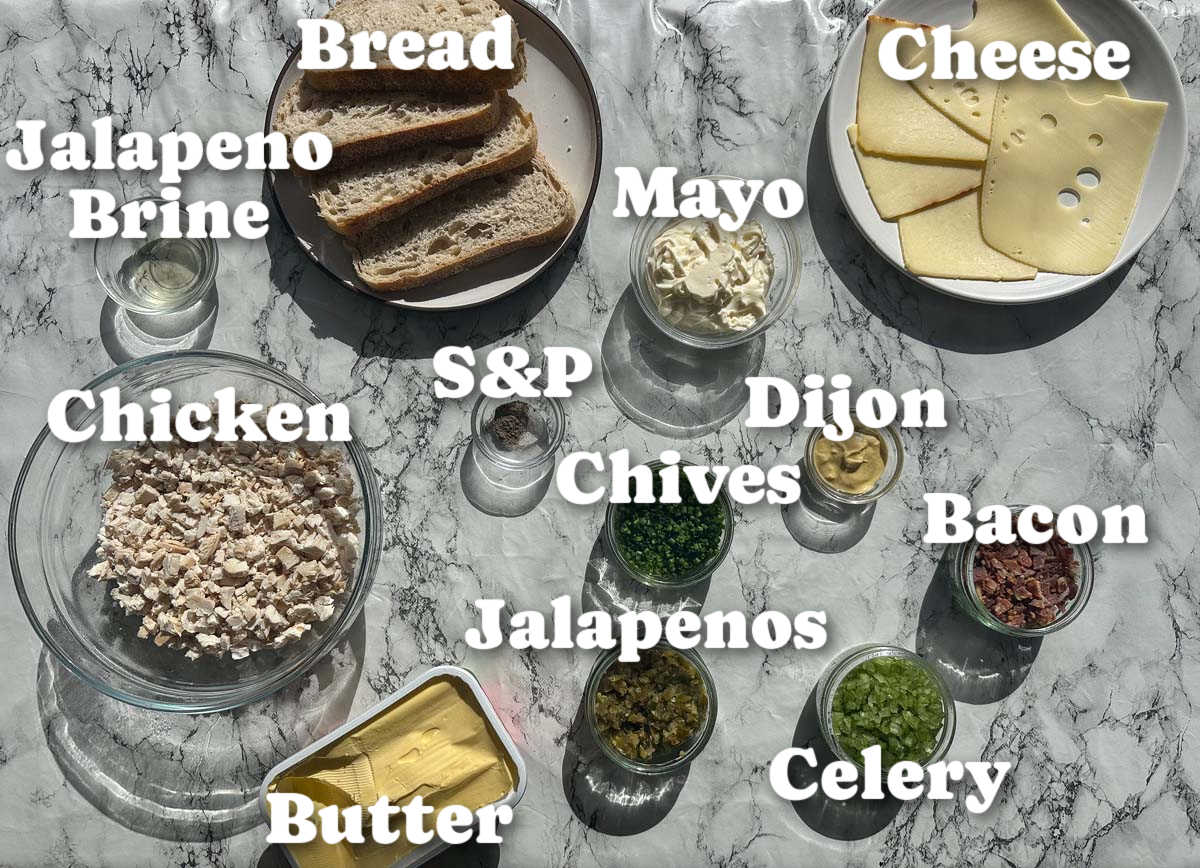
Chicken Melt Ingredients
I’ve kept the ingredients list to items you can find at the supermarket, with some ingredients hopefully being knocking about in your cupboards too. Here’s what you’ll need:
- Bread – you’ll want something sturdy like Sourdough. I don’t recommend soft sandwich bread because it won’t contain the filling efficiently.
- Cheese – I love a combo of Swiss cheese and smoked cheddar. The Swiss offers a mild, nutty flavour and a nice stringy, gooey texture. The cheddar adds heaps of flavour.
- Butter – for toasting the outside.
- Chicken – I like to use the white meat (breast) but you can use dark or a mix of both.
- Mayo – this keeps the filling nice and creamy.
- Dijon – this offers a mild bit of heat and enhances the cheesy flavours.
- Bacon – where there’s chicken there’s gotta be bacon, right?
- Jalapeños – these are awesome for a kick of spice. You can sub gherkins/pickles if you don’t like spice. I love adding in the brine too in either case.
- Celery – adds a little texture.
- Chives – these add loads of flavour and pair perfectly with both the chicken and cheese.
- Seasoning – season the filling with salt and pepper (to taste).
Recipe Tip
I highly recommend dicing everything nice a small (including the chicken). Just so you get a bit of everything with every bite. The filling is also more easily contained if everything blended together a bit more.
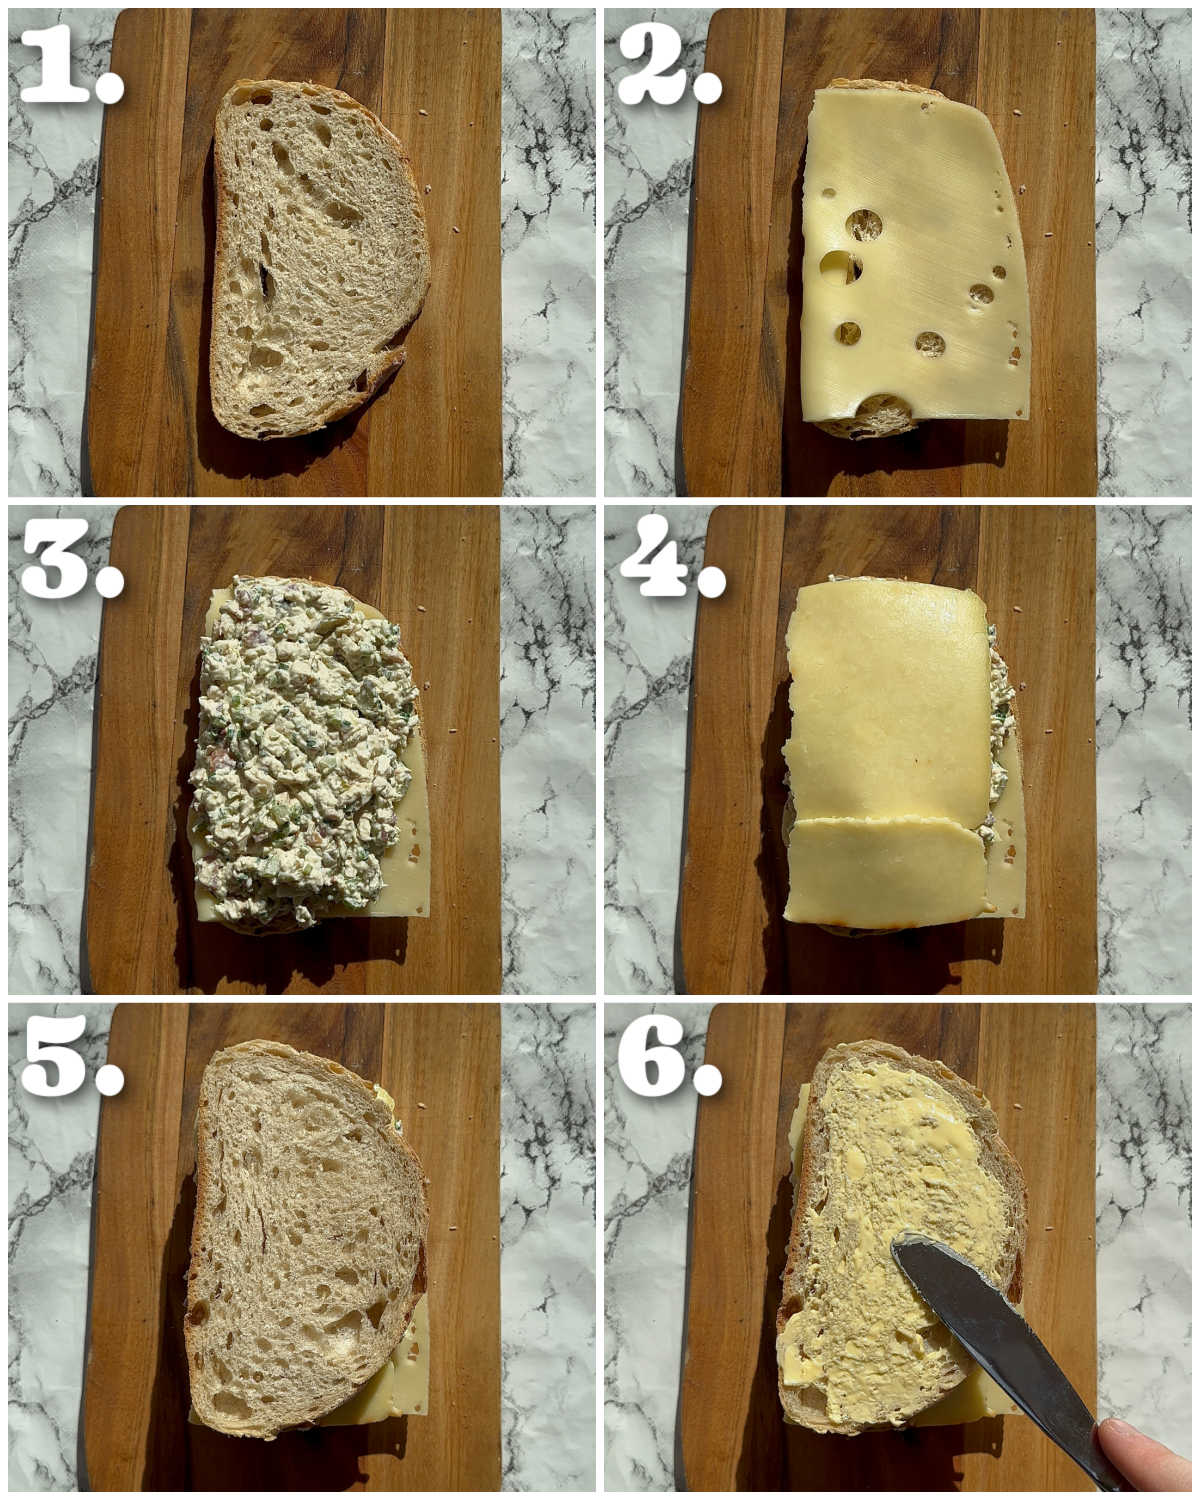
Making a Chicken Melt
Pretty straightforward from here – cheese on the inside and butter on the outside. In recent times, I tend to butter one side of the sandwich, place it butter-side-down in the pan then butter the top side. Just to save you from losing butter on the chopping board and making a mess!
Process shots: lay bread on chopping board (photo 1), add cheese (photo 2), add filling (photo 3), add cheese (photo 4), add bread (photo 5), butter bread (photo 6).
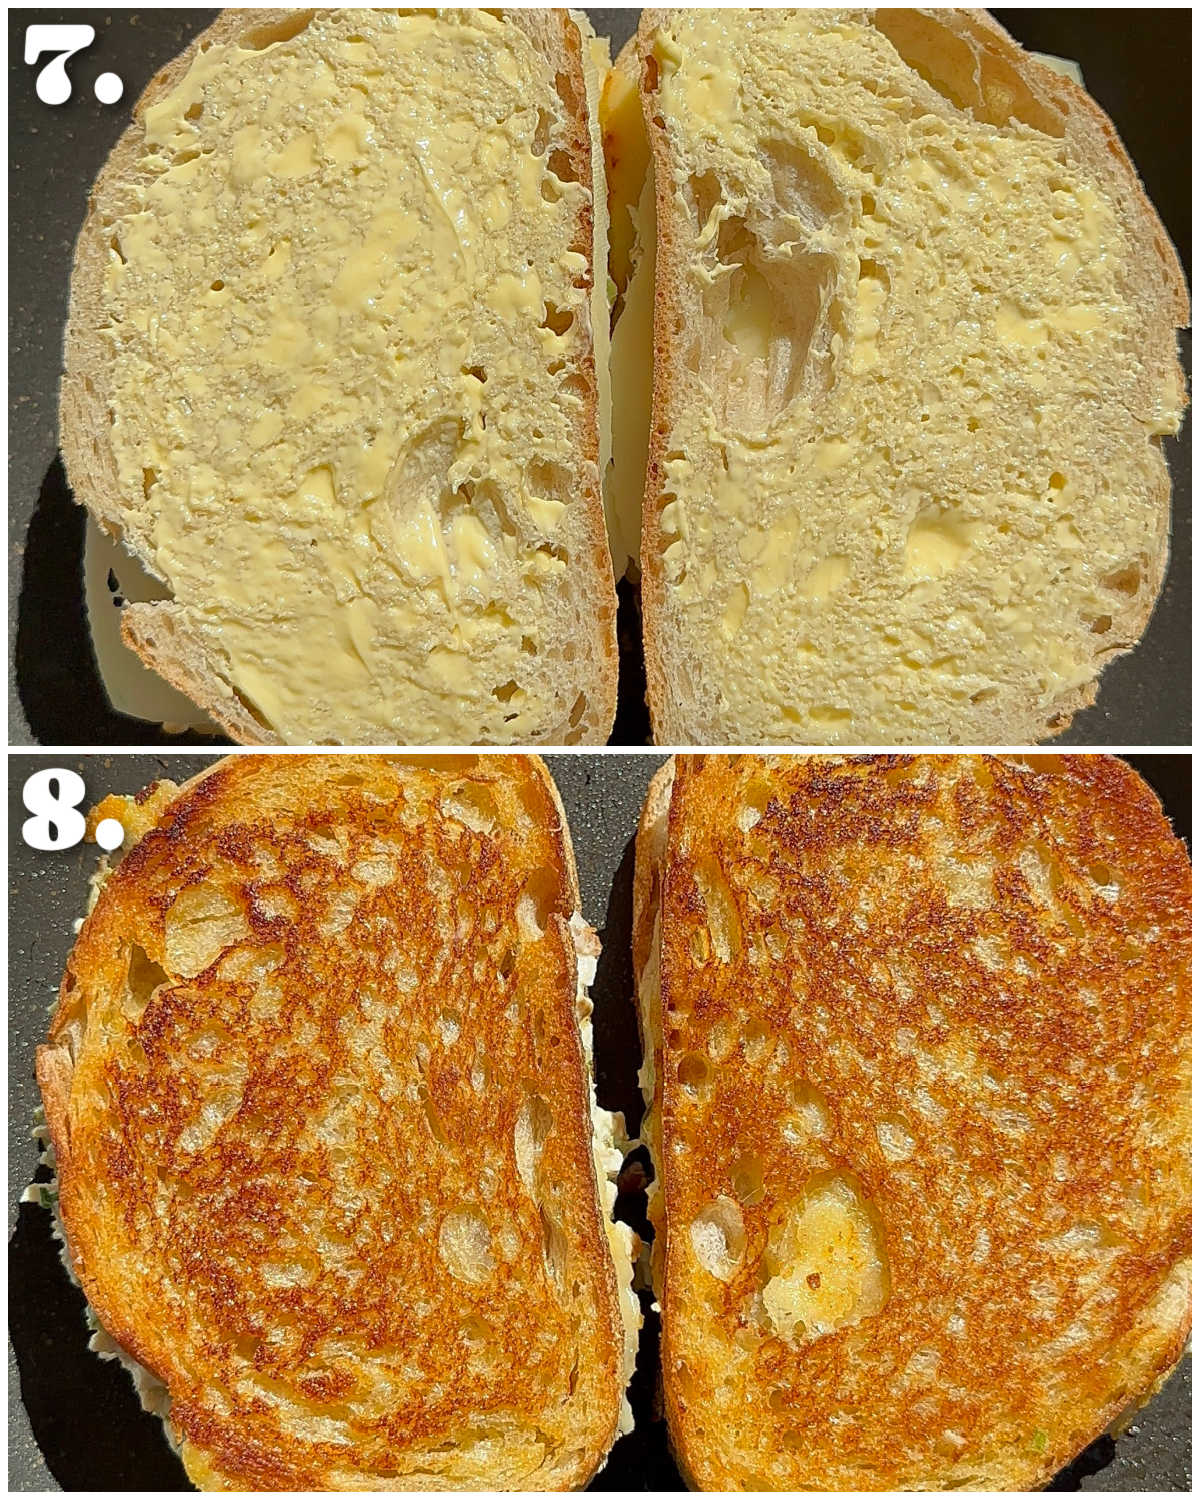
Cooking a Chicken Melt
To get that gorgeous golden crust on a chicken melt, it’s got to be pan-fried. I recommend using a medium-heat and no higher. Too high and the bread burns before the cheese melts and too low and the filling gets too gooey and the bread won’t have a nice crunch.
Process shots: add sandwiches to pan (photo 1), fry both sides (photo 2).
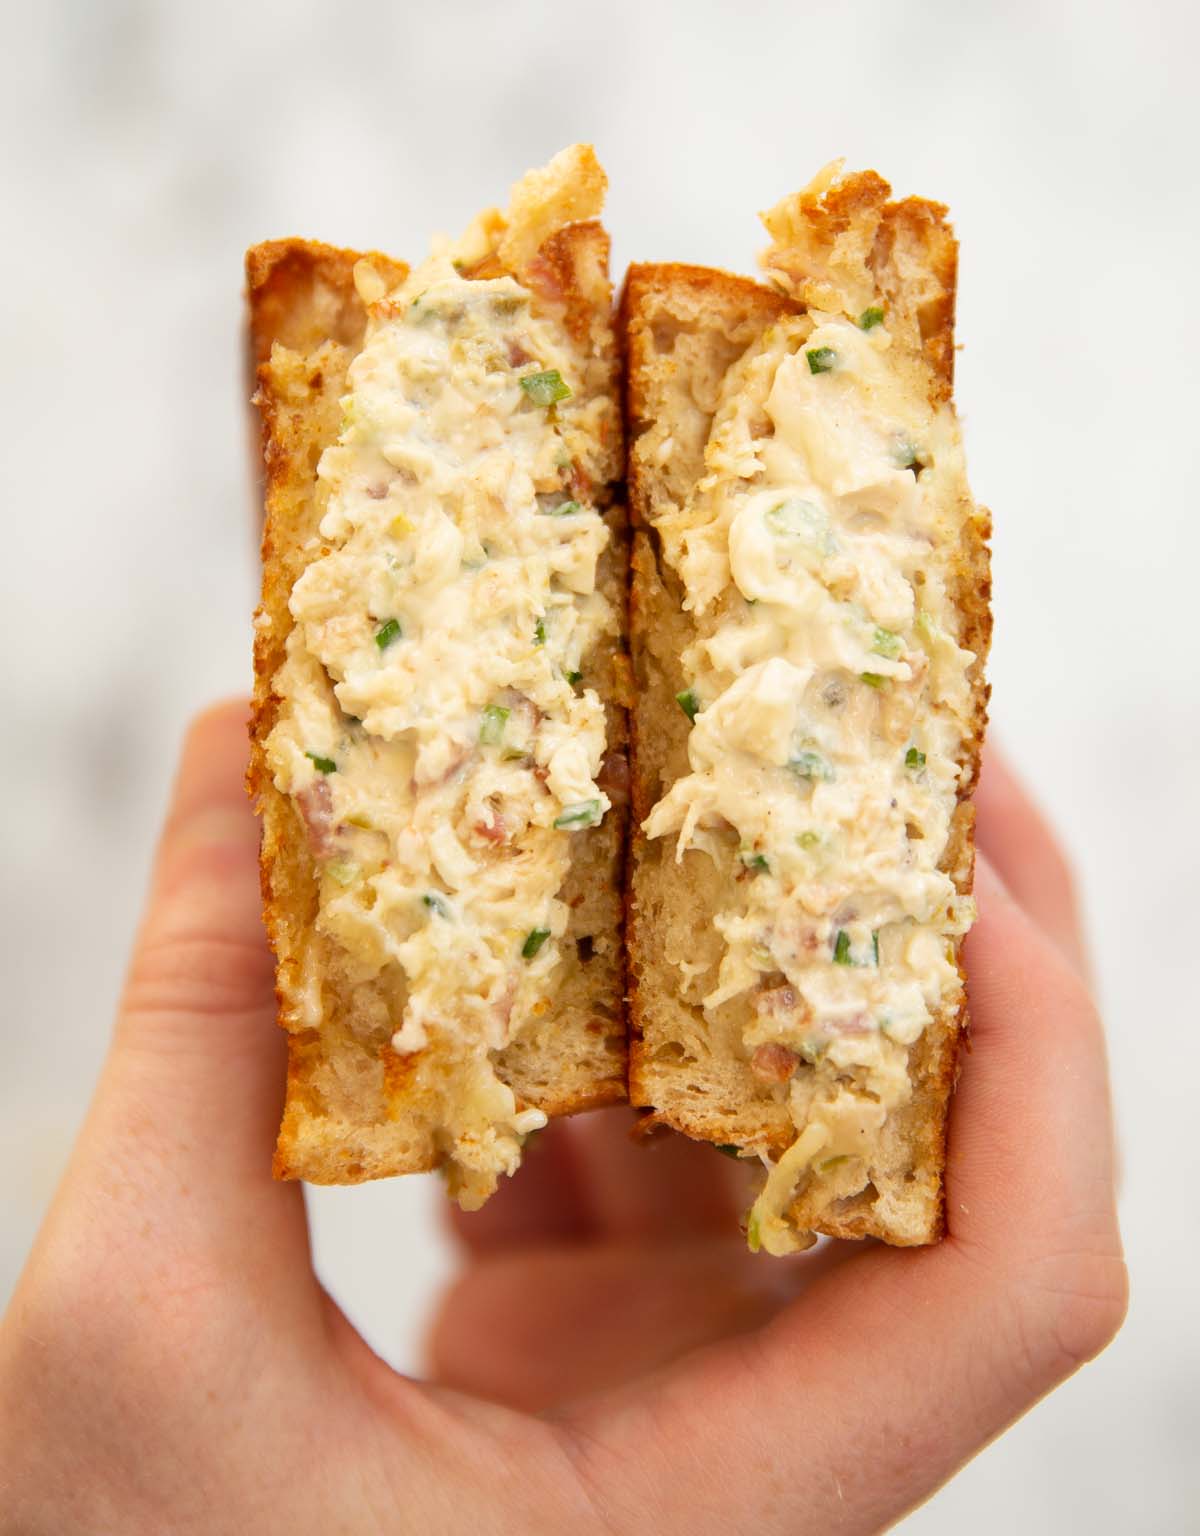
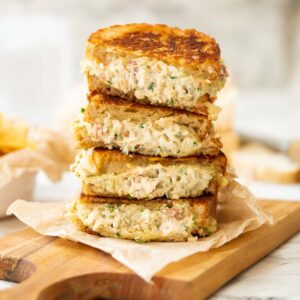
Serving a Chicken Melt
You’ll know the chicken melt is done once it’s golden and crisp on the outside, and you notice the cheese melting around the outside. From there, just slice in half and enjoy!
I typically just whip this up for Lunch, but you could add some Sides to make it a full meal if you wanted. Here’s some ideas:
- Crisps – there’s nothing that crisps don’t go with, but side-by-side with a toasted sandwich is where they’re happiest. You could go wild and make Nachos too!
- Hearty Sides – turn it into a full meal with some Onion Rings, Wedges or Loaded Fries!
- Salad – keep it light with a simple side salad.
For the sister recipe to this, check out my Classic Tuna Melt!
Alrighty, let’s tuck into the full recipe for this chicken melt shall we?!
How to make a Chicken Melt (Full Recipe & Video)
Classic Chicken Melt
#wprm-recipe-user-rating-1 .wprm-rating-star.wprm-rating-star-full svg * { fill: #343434; }#wprm-recipe-user-rating-1 .wprm-rating-star.wprm-rating-star-33 svg * { fill: url(#wprm-recipe-user-rating-1-33); }#wprm-recipe-user-rating-1 .wprm-rating-star.wprm-rating-star-50 svg * { fill: url(#wprm-recipe-user-rating-1-50); }#wprm-recipe-user-rating-1 .wprm-rating-star.wprm-rating-star-66 svg * { fill: url(#wprm-recipe-user-rating-1-66); }linearGradient#wprm-recipe-user-rating-1-33 stop { stop-color: #343434; }linearGradient#wprm-recipe-user-rating-1-50 stop { stop-color: #343434; }linearGradient#wprm-recipe-user-rating-1-66 stop { stop-color: #343434; }
Equipment
-
Medium Sized Mixing Bowl
-
Sharp Knife & Chopping Board
-
Large Pan & Spatula/Turner
Ingredients
Filling
- 150g / 5.3oz Cooked Chicken, finely diced (see notes)
- 3 slices of Streaky Bacon, cooked, cooled & finely diced (raw weight = 60g/2oz)
- 60g / 1/4 cup full-fat Mayo
- 1 tsp Dijon Mustard
- 2 tbsp finely diced Jarred Jalapeños (+ 2 tsp of the brine – see notes)
- 2 tbsp finely diced Fresh Chives
- 1 thin rib of Celery, very finely diced (see notes)
- Salt & Black Pepper, to taste
Sandwich
- 4 large slices of Bread (see notes)
- 2 slices of Swiss Cheese (or enough to fit the bread)
- 2 slices of Smoked Cheddar (or enough to fit the bread)
- Butter, as needed
Instructions
-
Add all of the filling ingredients to a medium-sized mixing bowl and give it all a good mix until well-combined. Check for seasoning and adjust with salt and pepper.
-
Lay two slices of bread on a clean surface/chopping board and add the Swiss cheese. Spread over the filling then top with the smoked cheddar. Finish with a second slice of bread and spread with butter.
-
Place the sandwiches butter-side-down in a large pan and then spread butter over the top. Turn the heat to medium and cook both sides until golden and crisp with the cheese melted in the centre.
-
Slice in half and enjoy!
Video
Notes
b) Celery – I like to dice/mince the celery particularly finely. It’s important to be there for the texture, but if it’s too large I personally find it distracting.
c) Spice/Jalapeños – This sandwich does have a nice kick of spice from the Jalapeños. If you don’t like spice I recommend subbing gherkins/pickles + 2 tsp of the brine.
d) Bread – Something sturdy like Sourdough works nicely. I actually used a crusty bloomer to film, and that worked nicely.
e) Cheese – I highly recommend a combo of Swiss and Smoked Cheddar, but do branch out and use whatever cheese you fancy after trying that if you want. I find one slice of Swiss usually fits, alongside 1 1/2 slices of smoked cheddar (typically smaller than the slices of Swiss). Just use your best judgment and measure with love.
f) Calories – Per sandwich assuming 1 tbsp butter each.
Nutrition
Chicken Melt FAQ
You’ll get a much better crust in the pan, but you can air fry if you’d prefer. Check out my Air Fryer Ham & Cheese Toastie for guidance.
You could make the filling. Just tightly store it in the fridge for a couple of days. Give it a good stir before adding to the sandwich (bringing to room temp first will help it cook through more evenly).
You could use mayo if you’d prefer. I’m just a butter purist and you’re already using mayo for the filling, so it’s nice to have the rich, buttery flavour on the outside.
For more similar recipes check out these beauties:
Toasted Sandwich Recipes
- Bacon Grilled Cheese
- Breakfast Grilled Cheese
- Halloumi Sandwich
- Chicken Tenders Sandwich
- Chicken Pesto Sandwich
The post Classic Chicken Melt appeared first on Don't Go Bacon My Heart.